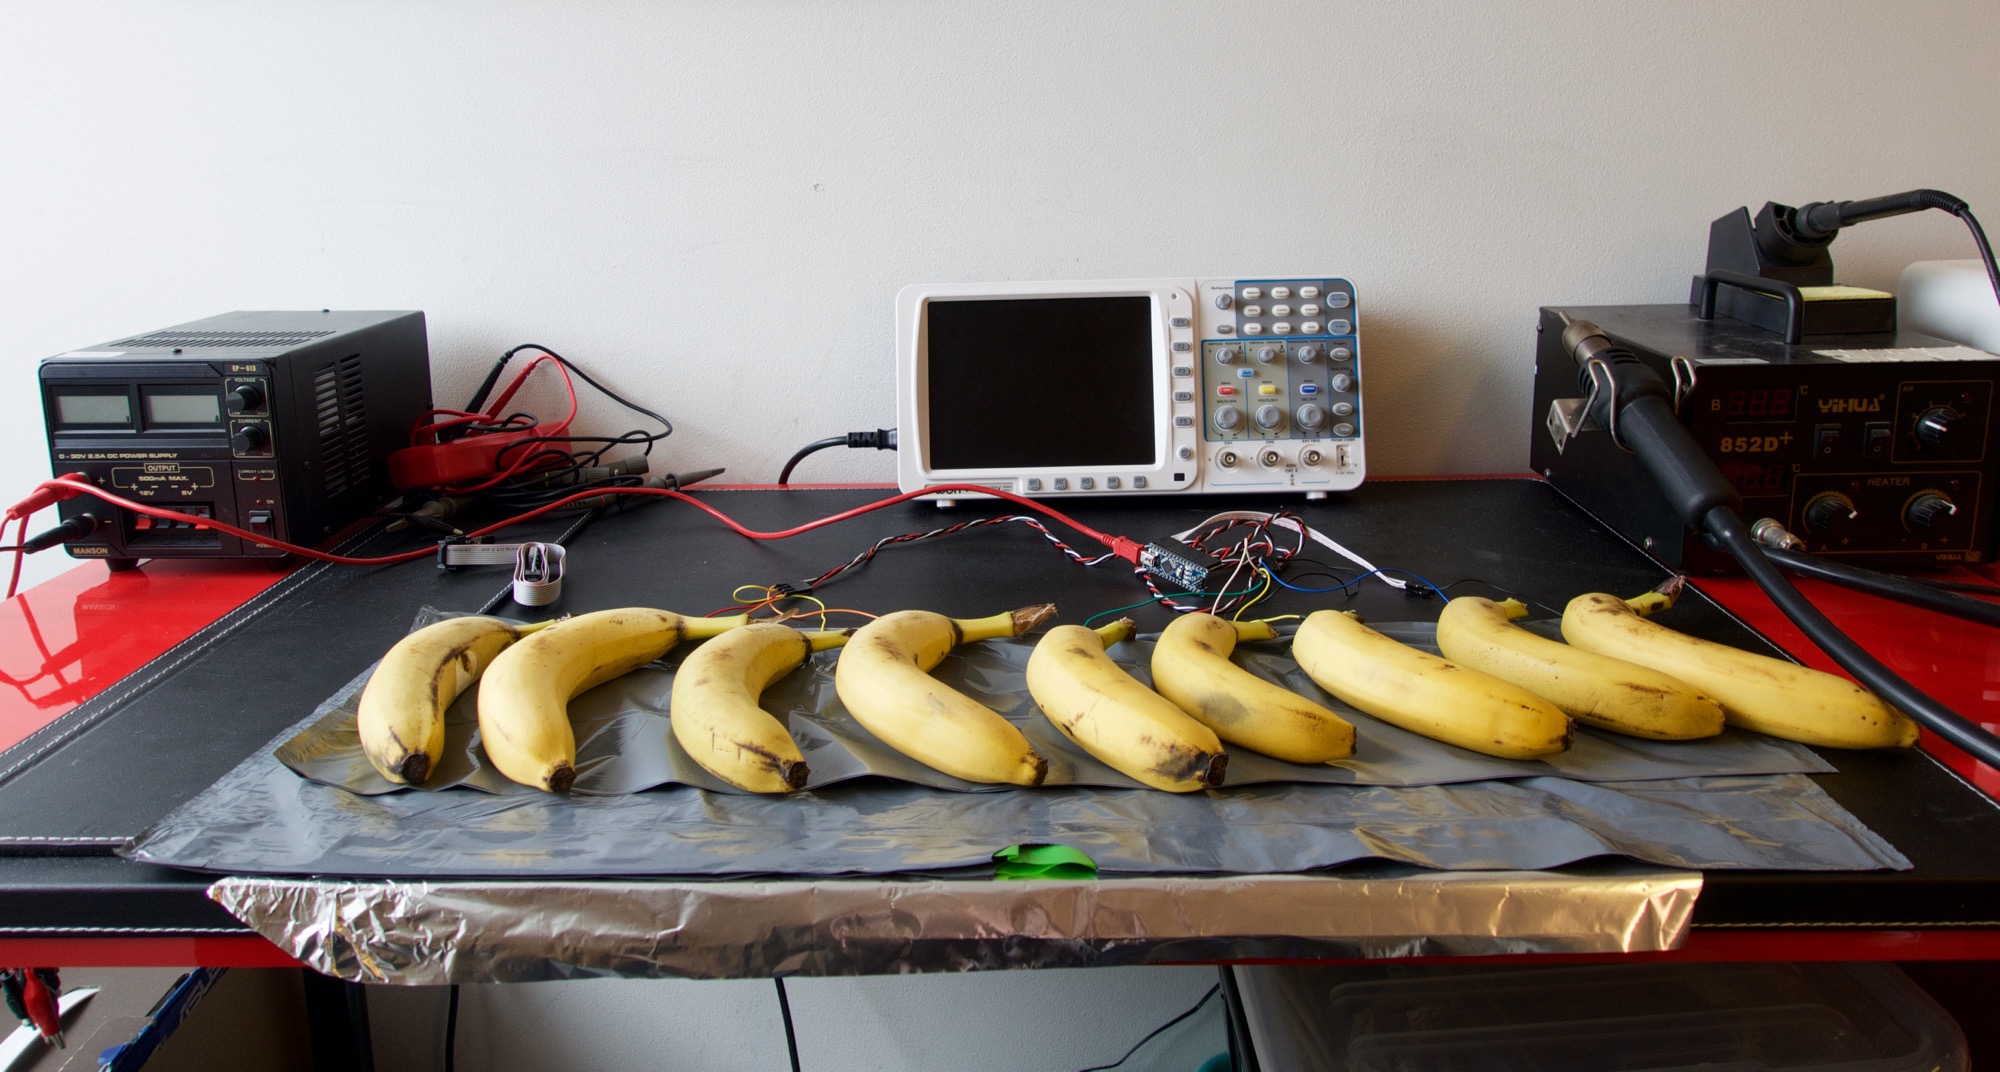
This weekend my niece-in-law is staying over, and to maintain my image as the crazy scientist uncle I've planned to make a banana piano (and lots of weird ice creams). In clojure there's a pretty cool programmable audio environment called Overtone. Overtone features a decent sampled piano, and I'm thinking this could be a great basis for a banana-piano.
Fun fact: a full piano requires about 11 kg bananas - at $3 per kg that's still way cheaper (and lighter) than a Steinway.
There's a couple of ways we can make bananas act as tangents, one of them is to use the bananas as capacitive touch sensors. Using a nice little hack it's possible to do this using regular digital pins on a microcontroller. The hack is (afaik) originally from Mario Becker, Fraunhofer IGD, 2007 (website dead). Check out the article on capacitive sensors over at arduino.cc.
- Hook up a pin to something.
- Disable interrupts.
- Set pin as input.
- Active pull-up on pin.
- Count cycles until pin is high.
- Enable interrupts
- Set pin as output, low.
The number of cycles needed before the pin goes high will depend on the capacitance of whatever connected to the pin. A banana might require 8 cycles before the pin goes high, while a touched banana might require 15.
We can connect a number of bananas to a microcontroller, iterate over the bananas, read their cycle count before banana-pin goes high, and then transmit a message over a serial connection indicating the pin number if this cycle count is above a given threshold.
const int PORTS[8] = { 2, 3, 4, 5, 6, 7, 8, 9 };
const int THRESHOLDS[8] = { 13, 13, 13, 13, 13, 13, 13, 13 };

bool touched[8];

uint8_t readCapacitivePin(int pinToMeasure) {
  volatile uint8_t* port;
  volatile uint8_t* ddr;
  volatile uint8_t* pin;
  byte bitmask;

  port = portOutputRegister(digitalPinToPort(pinToMeasure));
  ddr = portModeRegister(digitalPinToPort(pinToMeasure));
  bitmask = digitalPinToBitMask(pinToMeasure);
  pin = portInputRegister(digitalPinToPort(pinToMeasure));

  // Discharge the pin first by setting it low and output
  *port &= ~(bitmask);
  *ddr  |= bitmask;
  delay(1);

  // Prevent the timer IRQ from disturbing our measurement
  noInterrupts();

  // Make the pin an input with the internal pull-up on
  *ddr &= ~(bitmask);
  *port |= bitmask;

  // Now see how long the pin to get pulled up. This manual unrolling of the loop
  // decreases the number of hardware cycles between each read of the pin,
  // thus increasing sensitivity.

  uint8_t cycles = 17;
       if (*pin & bitmask) { cycles =  0;}
  else if (*pin & bitmask) { cycles =  1;}
  else if (*pin & bitmask) { cycles =  2;}
  else if (*pin & bitmask) { cycles =  3;}
  else if (*pin & bitmask) { cycles =  4;}
  else if (*pin & bitmask) { cycles =  5;}
  else if (*pin & bitmask) { cycles =  6;}
  else if (*pin & bitmask) { cycles =  7;}
  else if (*pin & bitmask) { cycles =  8;}
  else if (*pin & bitmask) { cycles =  9;}
  else if (*pin & bitmask) { cycles = 10;}
  else if (*pin & bitmask) { cycles = 11;}
  else if (*pin & bitmask) { cycles = 12;}
  else if (*pin & bitmask) { cycles = 13;}
  else if (*pin & bitmask) { cycles = 14;}
  else if (*pin & bitmask) { cycles = 15;}
  else if (*pin & bitmask) { cycles = 16;}

  // End of timing-critical section
  interrupts();

  // Discharge the pin again by setting it low and output
  *port &= ~(bitmask);
  *ddr  |= bitmask;

  return cycles;
}

void setup() {
  Serial.begin(57600);
}

void handlePort(int index) {
  int cycles = readCapacitivePin(PORTS[index]);

  if (!touched[index] && cycles >= THRESHOLDS[index]) {
    touched[index] = true;
    Serial.print(index);
  }

  if (touched[index] && cycles < THRESHOLDS[index]) {
    touched[index] = false;
  }
}

void loop() {
  for (int i = 0; i < 8; i++) {
    handlePort(i);
  }
  delay(30); // cheap-ass debounce..
}
Your computer must be grounded for this to work reliably, and it also helps to add a ground plane under the bananas (see video).
When touching a banana, the microcontroller will transmit a character from 0 to 7, we can then receive this value in clojure using a serial-port library, turn it into an int, map the value to a scale to get a note. And play this using an instrument - in this case - the excellent sampled piano available in Overtone.
(ns musikk.core
  (:require [serial-port :as serial]
            [overtone.live :refer :all]
            [overtone.inst.sampled-piano :refer :all]))

(def port (serial/open "/dev/tty.usbserial-A800F185" 57600))

(defn chr->int [c]
  (-> (char c)
      (str)
      (Integer.)))

(defn banana-touch [input]
  (let [index    (chr->int input)
        my-scale (scale :C4 :major)
        note     (nth my-scale index)]
    (sampled-piano :note note :sustain 0.2)))

(serial/on-byte port banana-touch)
Now enjoy and experiment with scales and different instruments in Overtone - your efforts will not be fruitless. Maybe I'll make a broccoli theremin next time my niece visits. :)
Update:
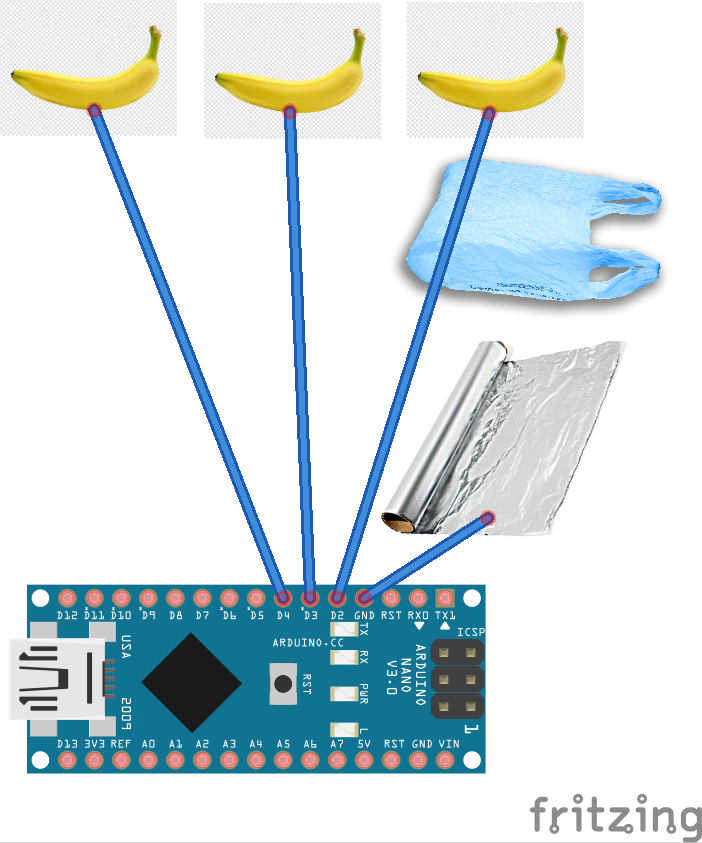
Since a few people have asked, here's a wiring diagram. It's super easy, only wires and no extra components. The ground plane (alu foil) is optional. If you're having problems in very noisy environments you can put a 1nF capacitor in line with the banana. I used an arduino nano, but any atmega328 based arduino can be used (nano, uno, etc). (And probably all others with minor modifications). Any wires you can connect to a banana and an arduino works. My arduino had male headers, I used 4p dupont female-female cables, which i broke out to 1p male-male for each individual banana. These come in all shapes, genders and lengths on ebay for very little money.
Clojure libraries used: [serial-port "1.1.2"] and [overtone "0.9.1"]
8 comments
Hello! Could you show the wiring diagram of bananas? Is "ground" used in wiring diagram? Do you know the project "MaKey MaKey"? Thanks!
P.S. Sorry for my English. This theme is very useful for me)
Hello!
Wiring is actually super simple, ground plane is connected to ground pin on the arduino. Each banana is connected directly to their own digital pin. Just wires, there are no other components. So: Alu foil <--> GND.. First banana <--> D2.
Yeah, someone told me about the makey makey after i posted this. Looks pretty interesting (and easy to use). I don't know if they use the same hack, they might be using proper capacitive touch hardware - some microcontrollers even have built in capacitive touch sensing.
Post updated with more information about components and wiring :)
Oh! Thanks!
Stian, this is just crazy cool! As a total arduino n00b, I'd really appreciate if you could specify exactly what you used to make this happen.
It's the perfect thing for @kidsakoder!
Thanks! :) Post updated with more info. Good luck :)
Also, have a look at http://sonic-pi.net - created by same guy as overtone. But more suited for educational purposes. I don't know how easy it's to add a serial connection there, but should be doable.
Hello!
Thank you so much for sharing!
Was wondering what exact kind of Capacitive TOuch sensor are you using?
I reckon this code only works with a specific model of sensor?
Thank you so much :)
Nine years later, and the information is still relevant. Thank you for your post. My friend and I are college students from the USA, and we used a Raspberry Pi 2 microcontroller with the built-in capacitive touch sensing. At first, I thought we were trying to close a circuit the traditional way, but since we didn't have a ground wire, I was confused, so I looked up more information to learn more. Now I know that the sensor in the Raspberry Pi is detecting the increase in the banana's capacitance. Thank you for your nice post, Mr. Eikeland.